what wires do i use on a ford efi distributor to run with coil only
I recognize that the ignition command part of an EFI system can exist the most intimidating part of the entire project. And nigh EFI Organisation manufacturers seem to focus more than on "how to connect information technology" than "how it works", so even later some folks go information technology working they really don't know what they did. The purpose of this article is to drill downwards just a little into the igntion wiring for the Holley Terminator / Terminator X and Holley Sniper EFI Systems, comparing these two it a bit more particular than I've seen washed elsewhere. If you can here but looking for tips on wiring the Terminator or Terminator 10 EFI ignition control, you can spring to that.
Sniper Ignition Wiring
The Sniper differs from the Terminator in that it has no EST/SPOUT signal--just a points output. That is why information technology cannot control ignition timing using the the GM Small Cap HEI or Ford TFI ignition. It tin can, even so, be used to control the timing on a fixed-advance distributor provided that the rotor phasing is correctly advanced. Holley offers two *3 methods, using either the new Holley HyperSpark Distributor, the Holley Dual-Sync Benefactor or the other involving an MSD distributor with a rotor phasing kit I volition talk over those and then offer i more off-the-radar solution that some may want to try. What works best for you lot will depend on product availability for your awarding as well as your budget (non to mention your ability to deal with frustration.)
Sniper Ignition Control Using Holley HyperSpark Distributor & Ignition System (Preferred!)
*Updated June 2018: WIth the recent release of the Hyperspark distributor in that location is NO REASON that anyone should cull any other ways of ignition timing control for their Sniper EFI Organisation. The cost and ease of installation alone make this a no-brainer.
The HyperSpark operates with the Sniper EFI System identically to the Dual-Sync benefactor (mentioned below) but costs 33% less and requires no adapter harness. Like any of the Sniper ignition timing control options it requires either a coil driver module or an ignition box simply the side by side big plus in favor of the HyperSpark distributor is the availability of the HyperSpark Ignition Box and HyperSpark Coil. When installed together these three combine to brand wiring this most as well easy. Three wires must be terminated but the rest of the system is plug-and-play with Metri Pack Connectors and two ring terminals for ability and basis.
Every bit for all of the stuff below almost rotating the engine to l degrees before TDC and this and that to become the rotor phasing correct--HyperSpark Distributor installers go a pass. If you lot can manage to set the engine on top expressionless center (the "0" mark on the harmonic balancer) on the compression stroke then the hard work is done. The kit includes a rotor phasing cap that holds the rotor precisely where is must exist relative to the base of the benefactor. Yous simply drop the distributor in identify, lock information technology down, and install spark plug wires.
The but claiming? At this writing only one application has been announced (for the Chevrolet Small/Large Cake Engine, of course.) But I fully wait Holly to release a robust line of different applications earlier they telephone call their work in this area consummate. Here is a wiring diagram showing the installation of the complete HyperSpark ignition including the distributor and optinoally-available ignition box and coil:
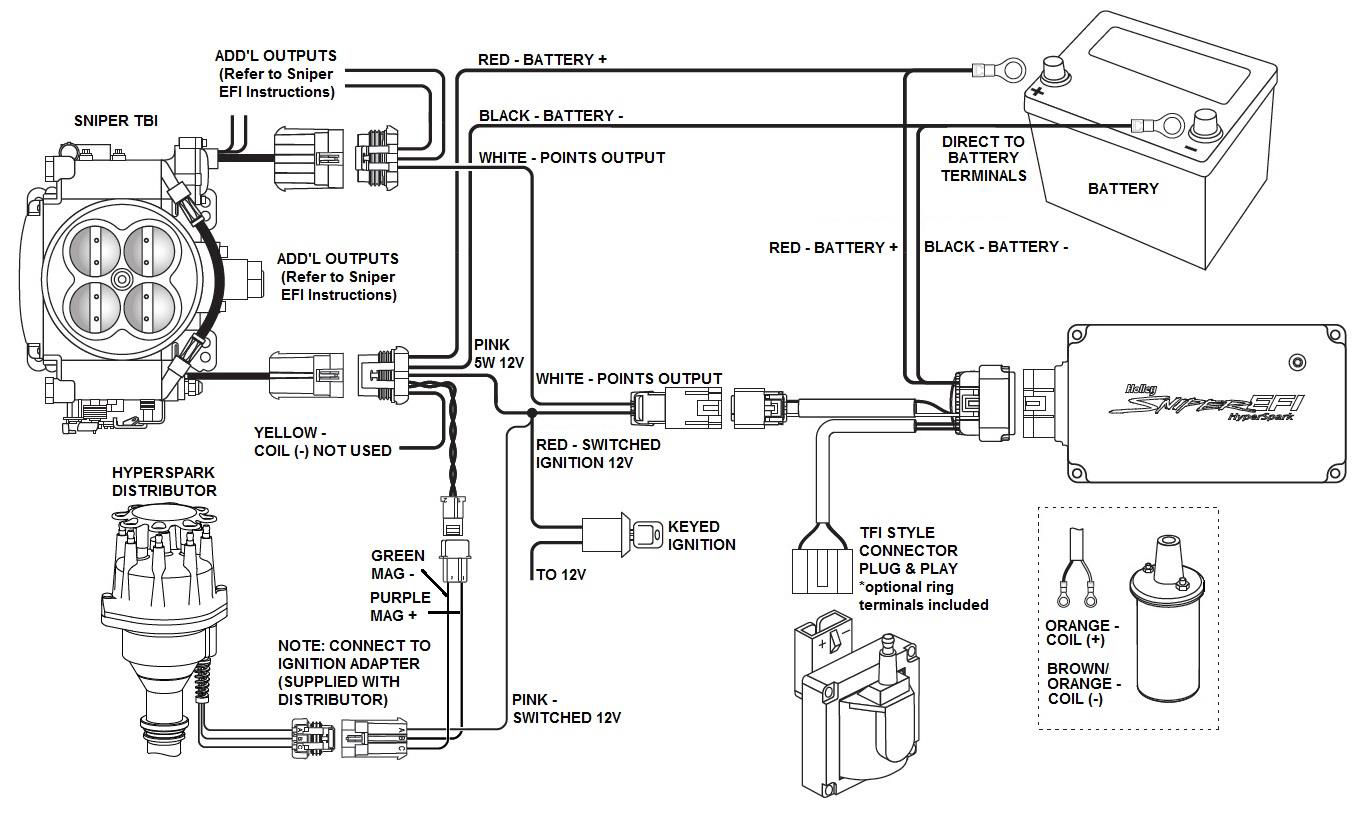
Sniper Ignition Wiring with Holley Hyperspark Distributor and Ignition
Note that the your Sniper EFI Organization must be running Handheld firmware 1.ane.7 or higher, ECU firmware 1.1.i or higher to operate with the HyperSpark ignition. If you lot use the Sniper EFI Software to configure your HyperSpark ignition yous must use version one.1 Build 2 or higher. Once installed as shown in a higher place, the Sniper EFI System should be configured equally follows, This is washed either using the setup wizard (if doing a new installation) or using the handheld tuning capabilities (navigate to Tuning > Avant-garde > Adv. Ignition for the Output Dwell and Tuning > System > Ignition Setup for the other three.)
- Ignition Blazon: HyperSpark
- Reference Angle: 57.five
- Inductive Delay: 100.0 usec
- Output Dwell: 2.0 msec
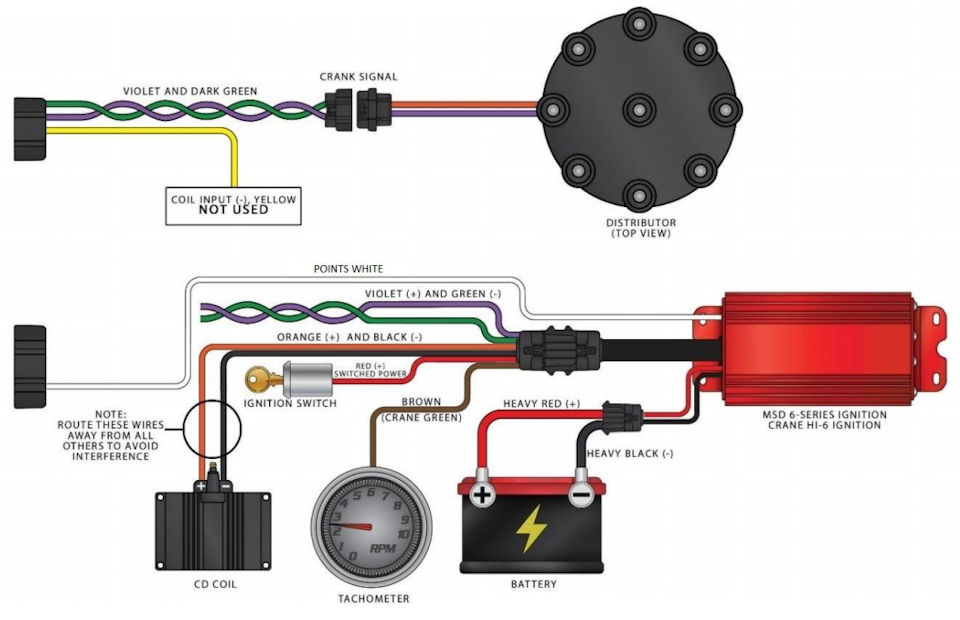
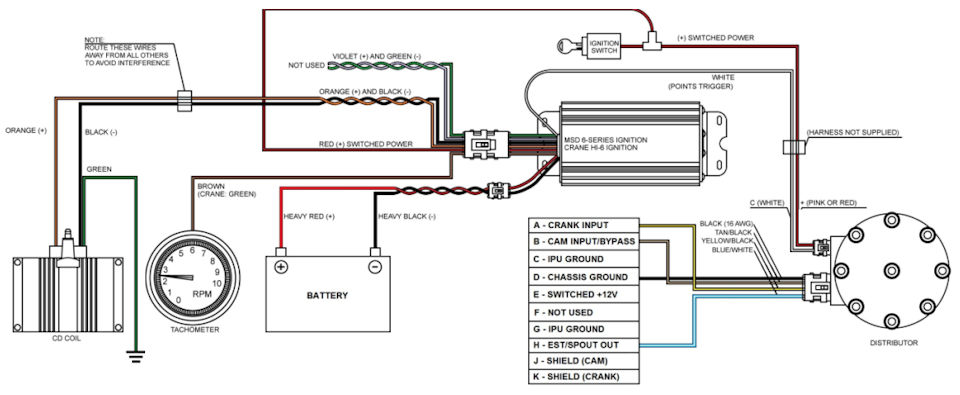
It'southward non mandatoryto use the HyperSpark ignition and coil with your HyperSpark distributor. You can apply any standard external coil and ignition box (or the Coil Commuter Module included in the Sniper 4150 EFI System.) Configuration is identical to that shown in the previous paragraph. Below is an example of the wiring for an MSD 6AL. Other capacitive ignition boxes will exist wired similarly.
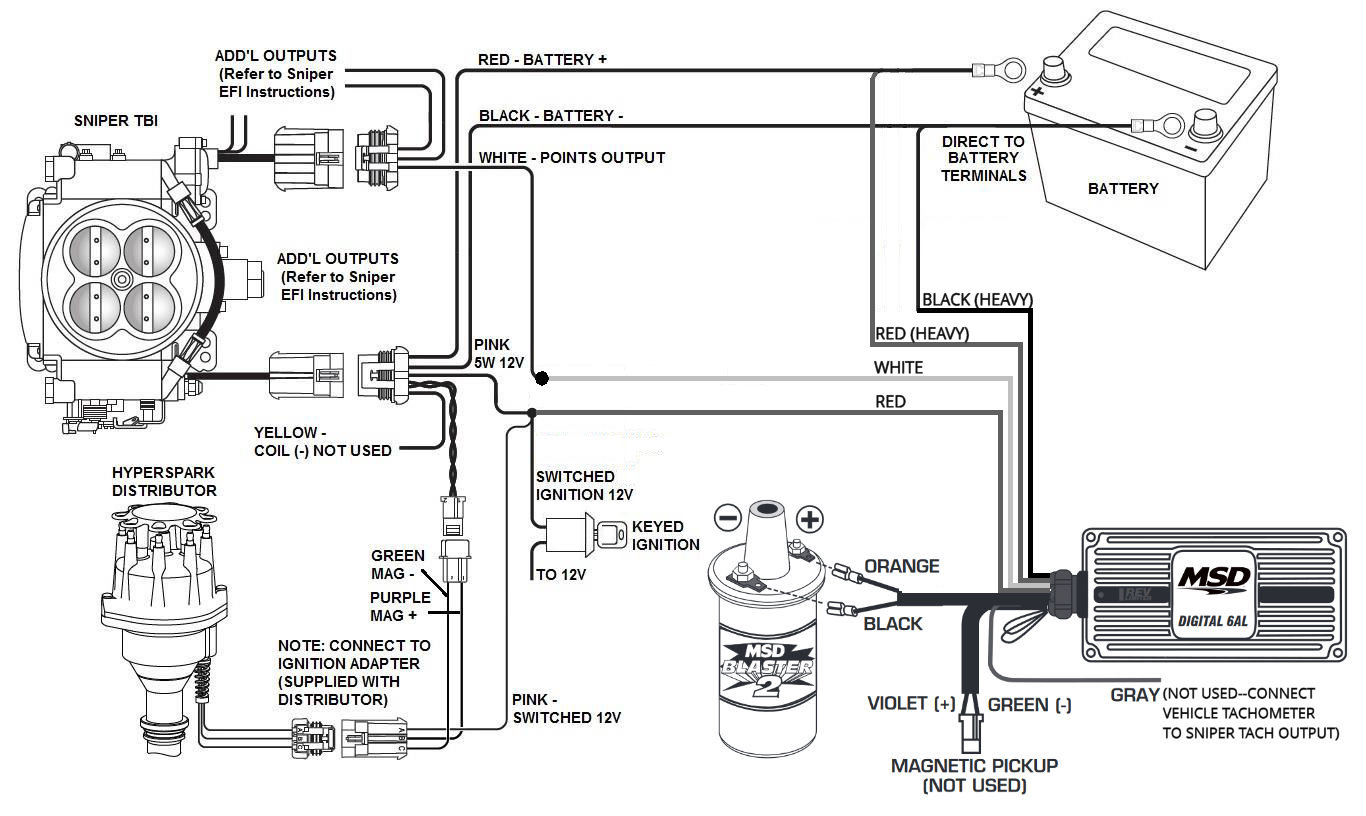
Sniper Ignition Wiring with Holley Hyperspark Distributor and MSD Box
Sniper Ignition Control Using Holley Dual-Sync Distributor
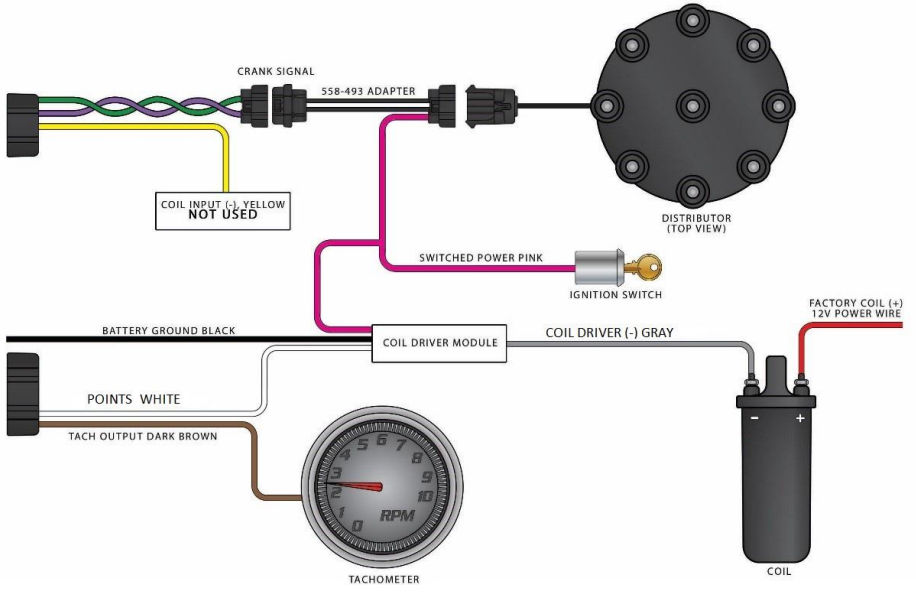
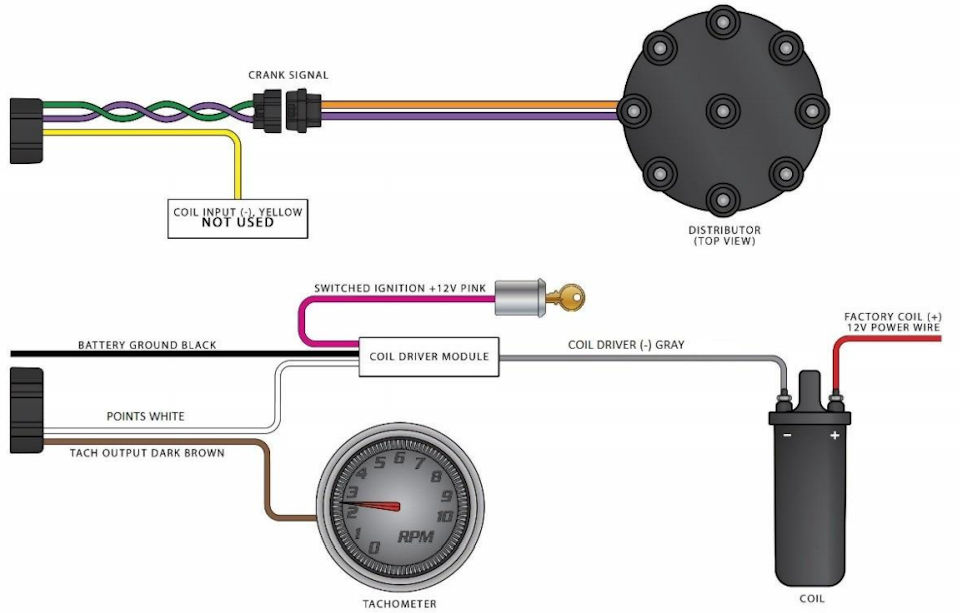
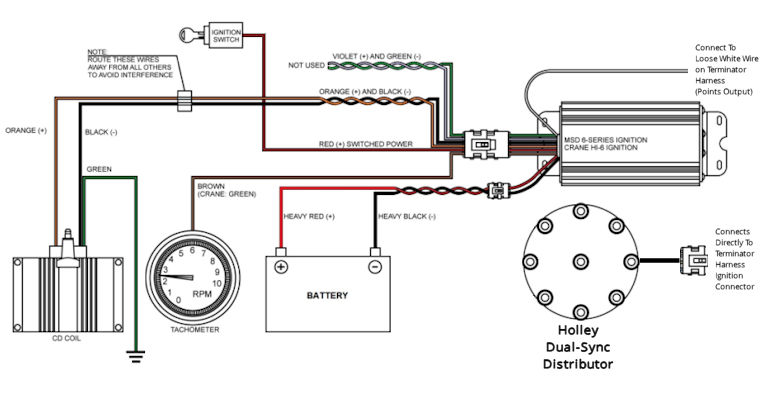
If no HyperSpark Distributor is available for your awarding then I recommend performing Sniper timing control with the Holley Dual Sync Distributor. No lock-out procedure or rotor phasing kit is necessary and the installation is greatly simplified via a adapter cablevision that connects the Holley EFI benefactor's 10-pin connector to the Sniper two-pivot creepo signal connector. Simply like when using an MSD distributor with the Sniper, the included coil driver module or a CD box must exist used. These two images bear witness each without and with a CD box:
Sniper Ignition Wiring with Holley Distributor, without CD Box

Sniper Ignition Wiring with Holley Benefactor, with CD Box (MSD 6A Shown)
Here's a corking video detailing the setup of the Holley Dual-Sync Distributor with the Shiper EFI System. If you follow these instructions you tin can set the ignition configuration as follows:
- Ignition Type: Holley Dual Sync
- Reference Angle: 50.0
- Inductive Delay: 100.0 usec
- Output Dwell: ii.0 msec
Sniper Ignition Command Using MSD Distributor
I exercise not recommend Sniper ignition control using the MSD distributor if a Holley HyperSpark or Dual-Sync Distributor is available for your application. I highly recommend using the Holley dual-sync distributor instead. Yes, I know that many of you come up into this relationship already having an suitable MSD distributor. I encourage you to advisedly consider the costs.
Some customers are struggling with RFI problems that seem to exist introduced by the magnetic pickup. This has nada to do with MSD--information technology'south just the nature of a magnetic pickup in a high-RFI environment. It works flawlessly triggering a boxing-hardened ignition organization only when connected to more than sensitive electronics it leaves the potential for issues. The Holley DSD, on the other hand, uses a hall effect pickup which simply doesn't struggle with the same issues as a magnetic pickup. Plus the Holley DSD is much easier to set upwardly in the first place.
That stated, an MSD distributor can exist used to perform ECU-controlled timing with the Sniper ECU. Both mechanical and vacuum advance must exist locked out and a rotor phasing kit must be installed and adjusted accurately. With the advance locked out, the rotor phasing kit allows you lot to manually set the position of the rotor to the correct location. This can be done with or without a capacitive discharge box. Just like when using the points output with the Terminator, a curl commuter module must exist used between the ECU Points output and the COIL (-) if a CD box is not used.
If you cull the MSD distributor road for doing Sniper ECU-controlled, timing, I practice take some suggestions. Using the Sniper software, you lot tin can go to System Parameters > Engine Parameters and find the Ignition department. The ignition type should be correctly set to "Magnetic" but the Minimum Organization Voltage will exist 0.00v and the Filtering will exist Low. Y'all will need to tune these values. Some have institute that 0.65v is a more appropriate MSV, and some too prefer to increase the filtering on this to "High". Note that if you lot increase the MSV too high so it will take problem detecting whatsoever indicate when cranking.
If the in a higher place suggestions do non eliminiate the RF interference problem, another user I know went back to the original non-adaptable rotor. It sort of defies logic why this works but he claims information technology did the trick for him and I'm sure he's right. Be aware that this makes an already somewhat arduous procedure of setting the timing fifty-fifty more of a claiming as you accept to now use the benefactor position to compensate for spark bending at maximum torque. I would admittedly consider this a last resort and only consider it if the paragraph above does not solve the problem.
These next two wiring diagrams prove how to deport ECU timing control with an MSD benefactor both with and without a CD Box:
Sniper Ignition Wiring with MSD Distributor, without CD Box
Sniper Ignition Wiring with MSD Benefactor, With CD Box (MSD 6A Shown)
Spotter this video for detailed instructions on how to setup an MSD Pro-Billet Benefactor for use with the Sniper EFI System. If you follow these instructions then you volition desire to set your ignition settings as follows:
- Ignition Type: Magnetic
- Reference Angle: 45.0
- Inductive Filibuster: lx.0 usec
- Output Dwell: 2.0 msec
Sniper Ignition Control Using GM Large Cap HEI Distributor (Updated!)
There is one other method that has worked for some folks. That is to use a GM Large Cap HEI distributor. Compared to the first 2 methods this requires significantly more engineering science, and so proceed completely every bit your own risk. We know this does work, and it tin save you lot a few hundred bucks, simply I still believe that the large bulk of folks out at that place are better served to employ the Holley Dual-Sync Distributor.
This method requires that y'all get a GM Large Cap HEI distributor with the 4-pin module in it. GM offered these wtih 4-, 5-, and 7-pin modules. It is entirely likely that the 5- and 7- pin versions can be used as well merely that is across the scope of this article. The 4-pin module has connectors labled B, C, Westward, and M. Attach them as follows:
- Pin B: Leave Disconnected. This is the power for the module. You're non really using the module, you are just picking up the signals you demand at these points.
- Pin C: Connect to the greyness wire on the coil driver included with your Sniper EFI Organisation.
- Pivot W: Connect to the majestic wire (Creepo +) on the 7-pin connector
- Pin Chiliad: Connect to the green wire (Crank -) on the 7-pin connector
I have heard that sometimes it is necessary to reverse the regal and green wires on some distributors. Also, as implied in a higher place, you need to use the roll commuter module. Connect the other wires as shown in the previous examples.
In addition to this, you need to lock out the mechanical and vacuum accelerate (as is washed in the MSD method, to a higher place.) Rather than use some sort of rotor phasing kit, you only prepare the rotor phasing when yous lock out the vacuum advance. As I said, this is a flake of a hack so that's part of the risk.
Update: Recently, Ian of TurboCamaro.CA created this Amazing VIDEO of his success setting upward the GM Large Cap HEI distributor to do Sniper EFI System ignition control. This is a 30-minute video that is Full of details. Information technology is on a six-cylinder version of the large cap HEI but it should work likewise for the 8-cylinder version.
NOTE: If you lot are struggling with making any of the ignition timing control methods above work, check out this handy ignition testing technique for point-output controlled systems.

Terminator / Terminator X Ignition Wiring
Dissimilar the Sniper EFI System, the Terminator (HP / Dominator) and Terminator X ECU provides two means to do ECU-controlled ignition timing: Points Output (identical to the Sniper) besides as electronic spark timing /spark output timing (EST/SPOUT) signal. It should not exist surprising that wiring the Terminator EFI Systems to control ignition timing using the Points Output signat is very similar to doing then on the Sniper. Like with the Sniper, the white Points Output wire is used to ground the coil through either the Holley Curlicue Commuter Module (PN 556-150) or a capacitive ignition box (like the HyperSpark or MSD 6EFI) and distributed using the Holley HyperSpark Disstributor or Holley Dual-Sync Benefactor.
Terminator Ignition Command Using Holley HyperSpark Benefactor & Ignition System
Personally, I am a huge fan of the newly released HyperSpark ignition organisation. Nil beats it for plug-and-play simplicity. We offer a harness (PN ESP TERM2HS) that reduces the number of manual terminations to only one--LESS required by the Sniper! The HyperSpark ignition box does non offering a dedicated tach output point only the Term2HS harness provides a tach output betoken (blue wire.) You tin can use that to drive the tachometer. Some mill OEM tachometers may additionally need a "tach signal amplifier" to function properly.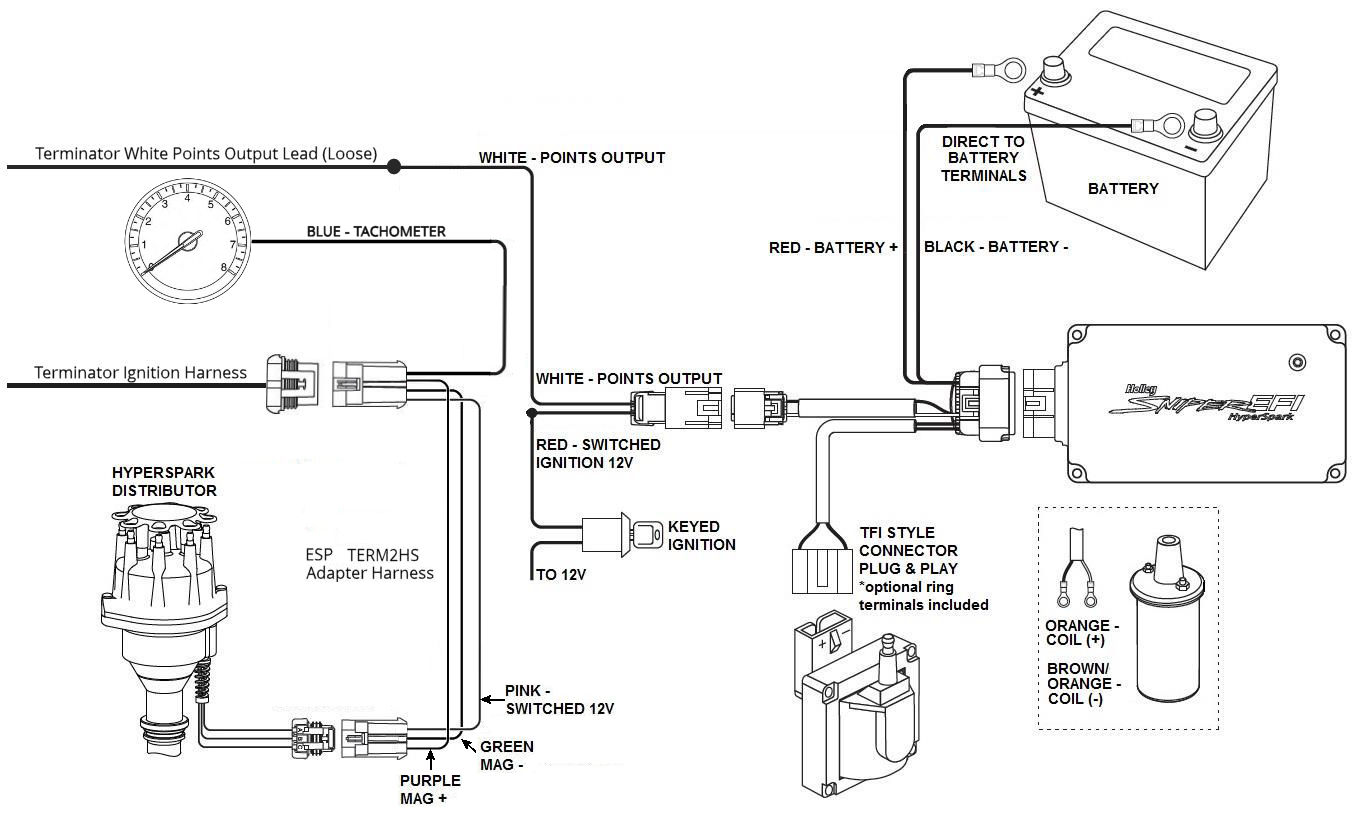
Terminator Ignition Wiring with Holley HyperSpark Benefactor
Here are the configuration settings you'll demand to employ when using the HyperSpark Distributor with your Terminator X (all software versions) or Terminator (using the Holley EFI version 5 or later on software for the HP and Dominator ECU:)
- Ignition Type: Sniper HyperSpark TBI / 1 pulse per fire
- Ignition Reference Angle: 57.5 Degrees*
- Cam Sensor: Not Used
- Output Setup Type: Points Output
- Output Setup Dwell Fourth dimension: 2.0 msec
*There are 2 errors that must be noted for Terminator X users. First, if you run the setup wizard on the Terminator X handheld and select the HyperSpark as your ignition choice, information technology is going to set the reference angle at 50 degrees--not 57.5. Of course, yous'll take hold of that when yous check your timing simply if you don't realize that it is an wrong IRA that caused this and then yous're going to adjust your benefactor by seven.5 degrees and that is going to whack your rotor phasing. Fix your IRA, non your distributor. This problem persists at least through handheld firmware 1.0.viii.
The second error is in the Terminator X software. If yous become in that location and look at the ignition reference bending yous're going to see that it is at 15 degrees. That is actually not the example. The control is errantly limited at 15 degrees and so that is what it displays for anything over 15 degrees. Conspicuously, it is impossible to use this to ready information technology at the right bending of 57.5 degrees. Ignore the xv degrees here and only use your handheld to change your reference angle to 57.5 degrees. This trouble persists through at least Terminator X software version V2.0 Build 50 and doesn't affect the standard HEFI HP/Dominator software used for the Terminator systems.
Here are the configuration settings you'll need to utilize when using the HyperSpark Distributor with your Terminator Ignition Arrangement using the Holley EFI version 4 software for the HP and Dominator ECU:
- Ignition Type: Custom
- Crank Sensor Type: i pulse/fire (Terminator V
- Crank Sensor Sensor Type: Digital Rising
- Crank Sensor Inductive Delay: 100.0 usec
- Crank Sensor Ignition Reference Angle: 57.5 Degrees
- Cam Sensor: Not Used
- Output Setup Type: Points Output
- Output Setup Dwell Time: 2.0 msec
Terminator Ignition Command Using Holley Dual-Sync Distributor
Terminator Ignition Wiring with Holley Dual Sync Distributor
Here are the configuration settings you'll need to use when using the Dual Sync Distributor with your Terminator Ignition System:
- Ignition Type: Custom
- Creepo Sensor Blazon: 1 pulse/burn
- Crank Sensor Sensor Blazon: Digital Falling
- Creepo Sensor Inductive Delay: 100.0 usec
- Crank Sensor Ignition Reference Angle: 50 Degrees*
- Cam Sensor Blazon: Single Pulse
- Cam Sensor Sensor Type: Digital Falling
- Output Setup Type: Points Output
- Output Setup Dwell Time: 2.0 msec
*Assuming yous install your distributor with the engine timing a 50 degrees BTDC on the compression stroke as suggested.
Terminator Ignition Control Using GM Small Cap HEI Benefactor
The EST/SPOUT signal is the same as is found in many factory ECUs. It is a +5V square wave trigger that is used to drive an HEI ignition module. Considering of that, it can exist used to control timing on a GM Pocket-sized Cap HEI or Ford TFI benefactor. This may piece of work with other factory distributors that apply an EST/SPOUT signal, just Holley just provides direct-fit adapter harnesses for these two at the time of this writing. The distributor produces a points output that sinks the electric current from the roll, initiating the spark at the timing determined by the ECU.
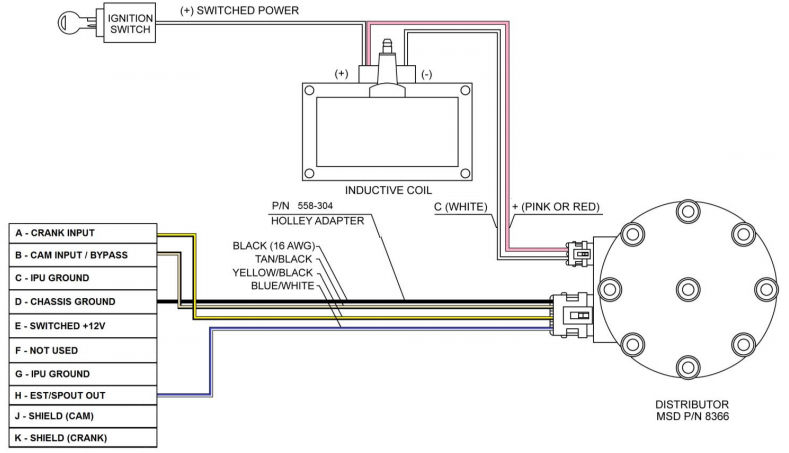
Terminator Ignition Wiring Without CD Box (GM Distributor Shown)
A couple notes about the diagram above. Shown is the GM small cap HEI distributor installation. Meet the Terminator education manual for Ford TFI example. Signals A-Yard represent the 10-pivot ignition connector on the Terminator main harness. Annotation that while the adapter harness carries the cam signal from the distributor to the ignition connector on the Terminator main harness, Holley does non populate that pin with a wire back to the ECU.
If a capacitive discharge ignition box is used, so the points output generated by the electronically-controlled distributor volition trigger the box to produce the spark ad the ECU-determined timing.
Terminator Ignition Wiring with CD Box (MSD 6A Shown)
Handy Ignition Cheque Tip (Ignitions Triggered with White Points Output)
Recognize that whenever the white points wire is grounded the ignition should throw a spark. Knowing that, y'all can follow these steps to do a quick sanity check on your ignition.
- Remove the coil wire at the benefactor cap, insert a spark plug into the end and footing the spark plug deeply to the engine..
- Plough the key to the "On" position but do not beginning or crank.
- Disconnect the 10-pivot connector and momentarily ground the white points wire going to the ignition. Each time y'all do you should observe a spark on the cylinder identified above.
Conclusion
I hope that this article has helped to bear witness that, once you understand some of the basics the different ignition configurations for the Holley Terminator and Sniper are not all that complicated. I would beloved to hear your comments or questions, and so please post them beneath. I generally reply within i business organization twenty-four hours.
Click here to read more manufactures from Chris almost the Sniper EFI System!
martineztogirtanot.blogspot.com
Source: https://www.efisystempro.com/efi-pro-hangout/demystifying-holley-terminator-sniper-ignition-wiring
Post a Comment for "what wires do i use on a ford efi distributor to run with coil only"